Tuesday, December 21, 2010

Matching Hats and Scarves


I got my order of Surgical hats done and they loved them! I made 6 of this (elastic) style, 5 mens hats, 3 Tie style hats!


I charge $10 for the women's hats and $7 for the mens hats!


I was introduced to the Loom not too long ago. So I have been making some "knit" hats. I love the faux fur, but have been experimenting with all types of yarn! I only have pictures of 1 set I have made even though I have made tons!


My daughter loves to pick out the yarn and has started trying to learn to sew and be crafty like me :)


I am trying to finish up a vest, skirt, a couple of shirts, and some jackets for my mother! I will hopefully have them done soon and have them posted on here! It will be a challenge with both the kids home for Christmas, but No later than the first couple of weeks of the new year!

thanks for coming by my page and have a Merry Christmas!

Tuesday, November 30, 2010

Surgical Hats... Surgical Hats... EVERYWHERE!

Now that our wonderful Thanksgiving week has gone, it is time to get to work. I have 14 hats to make asap! Luckily, these hats are fairly easy to make and I enjoy finding the material to use. I am making a Zebra print with Turquoise trim, a few Christmas patterns, and from there I will just have to find some more cute patterns!!

Here is a picture of the hats I have made so far!
There are two styles, one just elastic and the other ties in the back. I am working on a third style and will post pictures soon!!


Other than hats, I am working on a vest for my mother. I have never made anything from Faux Fur, so this is my first experience working with it. Will let you know how it works out!


Tuesday, November 16, 2010

Something New!

A friend of mine is a surgical tech at a hospital here and she (and her co-workers) has had the paper "shower cap" style hats made with cloth that they have worn in the past, but have not been able to find any recently. So I have been asked to make some! I tore a couple of old ones apart and made a couple! The cloth ones I have made are unique because they said you can usually only buy them in teddy bear prints, or solid colors, so I have made some fun ones for the girls and want to make some more fashionable ones for them. Needless to say my friend is pretty excited about them.


When my mother came in to town last week we went to Denver Fabrics, she found some material she LOVES. She loves her Chico's pants (the spandex/acetate fabric) but she can never find them in anything but black. At Denver Fabrics they have every color under the sun in this fabric. This is the first time I have ever worked with this material and I have loved making pants out of it! However, it does not iron well and will be difficult to make a Jacket/ shirt out of it when the time comes! She bought a TON of fabric to keep me busy for the next few months! I will post pictures as I get them done!

So this is a little dress I made for Scarlet about 2 months ago. It is a bubble skirt or you can make it without the bubble. I have made it both ways and it is just adorable. She can wear a long sleeve shirt under it now that it is winter...so it can work for any season!
I don't know why I did not tie the ribbon in a bow, but of course it makes a pretty bow in the back!


Right now I am working on one more interesting project...a friend of mine is having a Masquerade party for her birthday and she found a wonderful dress but felt like it was just a little too plain. So we decided it would be fun to give it a jagged (Tinkerbell) style hem. The dress is silk so it is proving to be a challenge but will be absolutely adorable!

There will be a lot of pictures in my future post as I get all these projects done, and I am starting my easter dress collection soon. Let me know if you have a princess in need of a beautiful, one-of-a-kind Easter dress!

God Bless and have a great day!
Angie

Friday, November 5, 2010

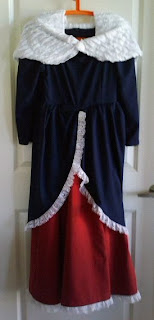
The Revolutionary War Dress


I finished the Revolution War style dress.

I could not find a pattern to fit the mold of what I figured a revolutionary war dress should be, so I had to modify a "Little House on the Prairie" style dress and make it a 1776 era dress.
The pattern I went by had the dress with a high collar attached to the bodice, so instead of adding the yoke, I simply left it out and sewed the bodice front to the lining and left the yoke off. I then had to make an over-skirt and figure out "where" to put it so that it would lay straight in the front center. I added the lace to the edging of the over-skirt and bottom. I then took a scrap piece of white material I had and measured it to fit over the shoulders. At first I was going to sew this in to the bodice, but after contemplating for a little while, I decided that it would be better to just keep it separate.
The girl I made this dress for will be doing a Civil War report next year that she will need a dress for. She wanted to know if we could use the same dress. Therefor, I left enough material at the hem to let it out up to 2 inches, and I made the dress a size bigger and then fit it to her (without trimming the excess) so that next year I can let out the hem and the bodice as necessary. I plan on making a lace yoke to fit under the bodice and maybe taking the over-skirt off and simply turning it opposite, cutting length off of it to make it a bow in the back with a draping in the front. I want to make a big hoop skirt to really bring the skirt around like Civil war era dresses. I might have to add some trimmings too.
I am very excited to see a picture of her in the dress. She loved it when we had our last fitting!

Sunday, October 24, 2010

Pajama Fun!

The fun thing about making Pajamas, is you can go crazy with ideas. Colors you would not normally wear out of the house or mix together. Patterns you can't think would look good on anything else but Jammies!!!


Here are a couple I have made for the kids.
I like the boys shirt pattern and think I am going to make Dylan some T-shirts. I love the 2-tone shirts like this.
Scarlet's Jammies were fun because I cut one of the kitties out to make an applique for the front of the tank. It says Cat-itude! I added the leopard print because I had some lying around and
It really helped bring the whole Pajamas in to a set!


I finished my husband's work shirt and it turn out great. I have not gotten a picture of it yet, I will post it when I get it. For this week I am working on a 1776 style dress for a little girl who is doing a report on Martha Pitcher. I also have about 100 patches to sew on a girl scout uniform.
Have a great day and thanks for stopping by!
Angie

Friday, October 15, 2010

We finally got my sewing area set up!


We moved in June and I finally have my sewing area set up and am in business!


Here in Denver there is a fabulous fabric store called Denver Fabrics, they have everything and great prices. This skirt to the left was made out of scrap fabric that you can buy by weight. I paid less than a dollar for the fabric, and it made an adorable skirt.


This dress I made for a friend in Florida. The dress has pockets where the material meets. The spaghetti straps criss cross on top and is very cute. I am hoping to get pictures soon of the dress on the girl I made it for!!

This dress can be made longer or shorter, with solid straps, sleeves and as seen!! I chose the contrasting prints but would look real pretty with one material choice.


I made this dress before we moved, I found the material to match her vans and could not help make her a cute dress to match them.

I like having the ties versus straps because it allows you to adjust the size you need them to be. As they get bigger you can easily put leggings under this dress to get a few more wears out of it!

I also put long sleeved shirts under it to make it a winter dress. Of course she grew out of her shoes, but still loves the dress.


We went to a Sock Hop a few weeks ago and I made some poodle skirts for some of the girls. We debated making the petticoats but were afraid the girls would not wear them due to being itchy and just too much! So we opted for good stiff felt and I ended up sewing some Thule on the bottom to give the illusion of a petticoat.


I made two of these shirts. They really turned out cuter than I thought. In the group picture, the two girls in the middle have the shirts I made on.


I have also been working on a tote bag for a friend, it turned out cute.
I used the material I had left over from some of the other totes I had made, and although the tote was different, I used the same material Combination.


I added a flower petal at the top of the strap for just a little flare. The tote has an inside pocket and is very comfortable carried on the shoulder or across (over the shoulder) style! Very flexible and plenty of room. It can be made to be reversible, although because of the flower petal, this one is not.


I am working on Pajama Sets right now for boys and girls, a wool/leather vest for my mother, and work shirt for my husband. These will all be in my next post.
Thanks for visiting my post and have a great day!!
Angie


Saturday, February 27, 2010

TuTus for my Ballerina!


Scarlet started dance this year, so naturally I had to learn to make TuTu's. Then I learned how to make bows to match the tutu! Fun and exciting!
This is a simple knot tutu around elastic alternating black and orange.

I then learned that using ribbon (instead of elastic) would give it the extra style plus...they tend to look better because you do not have to deal with the elasticity. I found with elastic, because it stretched, it was difficult to
make sure the size was right and I used more Tule than I had to. With a ribbon you are able to measure the size and make it fit, and as they grow add or remove if you wanted to! So I prefer the ribbon. You might have some problem if the little girl wearing the tutu has no hips. In this case you could do a combination of ribbon and elastic, just sewing the elastic to the ribbon. This still allows you to make the exact size but gives you some stretchy ability to stay up. I used the Tule as the wrap around for my bows just tie it all together a little more!


Then I wanted to make a little bit fancier one. So I simply made the same knot tutu and added an a-line cut sparkle organza over the tutu. I lined the organza with the ribbon sewing the showing side to the skirt. I then used a fabric glue to wrap the ribbon under, and I used it for 2 reasons. 1st, I did not want to try to make the seam invisible due to the sheer material. 2nd, the glue gives the tutu a certain stiffness to keep it "poofy"!

I added a bow to the back with a hook and eye to keep the tutu closed. Because the ribbon I used is slippery I needed to secure it. Quick Tip: After sewing the hook and eye to the organza, reinforce the fabric with either a dab of glue or fray blocker. And of course the matching bow. I seared the edges of organza with fire...just be careful not to apply too much heat, it sears quick.

I will post some other outfits I have worked on later. I love my tutus right now and have a couple more to make, and then I will be making another outfit to match the vans I bought my daughter.
Have a blessed day!

Newer Posts Older Posts Home